|
Balancing effect adjustment . |
20130510 +PDF

PDF
Optimizing the balancing effect of the unidirectional floor microphone :
1500Hz is in the frequency range where the ear is most sensitive and noises will be heard easily. Balancing adjustment can best be performed
using a test tone of 1500Hz.
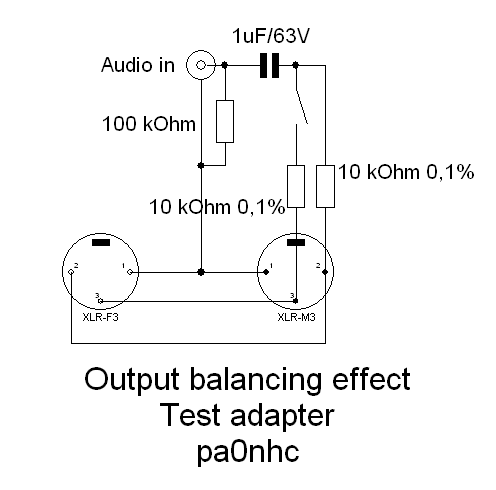
1. First make a test piece consisting of interconnected XLR male and XLR female plugs. See schematic.
IMPORTANT: both 10k resistors MUST have the same value. The max difference is only 0.1% (10 Ohms).
Best build it in a small (thin) ALU box. It is handy when the male XLR directly fits onto the mixer mic. input. That way you can avoid the use of cables.
2. Turn off power of the mixer.
- Turn down the headphone volume to ZERO (mind your ears!).
- Disconnect loudspeakers.
- Connect a headphone.
- Channel gain at minimum.
- Channel level at maximum.
- Channel EQ's at 0 (neutral).
- Main output slider at 0dB.
- Connect both microphone and mixer to the test adapter.
- Connect the tone generator to the test adapter and adjust it for an output of 1Vrms @ 1500Hz.
3. Switch on the mixer. Wait one minute for stabilization of all voltages in the microphone.
Be carefull not to damage your ears by loud switching noises and test tones !!
4. Open the switch on the test piece. The VU meter now shows a loud signal.
4. Adjust the mic.channel gain and/or generator output until the red channel-LED just starts to glow. The microphone cannel may not be overloaded.
5. Adjust the Main output slider until the VU meters just read maximal (+10dBu).
From now on, do NOT readjust channel gain, channel level, channel EQ's, or main slider.
6. Close the switch on the test piece. De VU-meter reading will drop down.
The difference in the above VU meter readings is a measure of the output balancing effect.
7. First use the VU meter as an adjustment indicator. Carefully adjust R11 on the line driver PCB for MINIMAL signal indication (-40dBu or lower).
8. Caution ! For best result listen through a headphone. First adjust the phone volume for minimal usable loudness.
Then adjust R11 for completely disappearing of the 1500Hz testtone.
9. Disconnect the headphone. Switch the signal generator between 50Hz, 1.5 kHz, 15kHz and 50kHz and read the VU meters.
The signal strength should be under -40dBu (better than 50dB balancing effect).
Problems.
Still to much signal at 50Hz? =-> C1/2 are not of equal value. If this proves to be difficult to achieve, you could replace
C1/2 each by a 1u or 10u 65V elco (+ connected to the T1/2 side).
Do NOT use tantalium as these sometimes make noises !
Still to much signal left at 15kHz or 50kHz? =-> C5/6 are not adequately paired. Max. difference is 0.1% (5pF). Use film capacitors !
NB:
If C1/2 and C5/6 are well paired, but T1/2 do not have equal hfe (DC gain), it is still possible to adjust for good balance at 1.5kHz.
BUT
at 50Hz and 15kHz the output will be to high, even when C1/2 C5/6 ARE exacly equeal !
>> For best results T1/2 MUST have equal hfe +- 5% (measure with a digital meter with transitor test possebility) <<