The assembly of one cavity. mod: 000118
13 Warning:
If you first should solder one side of a plate completely, the plate you are soldering will be pulled towards the soldered side, as the solder is shrinking while it cools off!
It is then very difficult to get the plate back again in a straight position and on 90 degr, without destroying the copper surfaces!
Solder alternating at both copper surfaces of a joint. Begin at the middle of a joint. Work symmetrically to both ends. Solder at equal distances. Constantly check the location, straigthness and correct angle (90 deg).
13.1 Accurately mark on the bottomplate "G" and baseplate "H" where the first of the sideplates "J" must come. Use a pencil or needle.
Solder "J" temporarely on "H" with only 2 solderpoints. Check the position of "J" and correct it.
Place 2 solderpoints on opposite sides of the first. Check that "J" is exactly 90 degr. at "H". Correct it by melting a solderpoint, and let it cool off while holding "J" in the correct position.
When OK, lock "J" to bottomplate "G" with 2 solderpoints.
13.2. Solder plate "J" further to "H" and "G".
Start in the middle and the utmost ends. Do this SYMMETRICALLY on BOTH SIDES of "J" (inside / outside).
Then place solderpoints SYMMETRICALLY (inside / outside) exactly in the middle between the last soldered points.
Repeat this until all solderpoints are abt. 10mm distance. Do not supply more solder, exept when absolutely needed.
Note: In the next step, the COMPLETED topplate is installed. This means: including fully soldered central conductor AND temporarely fixed coupling links. After soldering the sidelid, it is impossible to install the links, or solder the inner conductor!
13.3 Place the assembled inner-conductor / topplate combination on the correct location in the cavity under construction. If nessacery take of a little bit from a corner of "A".
Support the end of the central conductor with
the wooden caliper. The topplate "A" serves as the other spacer between plates "J".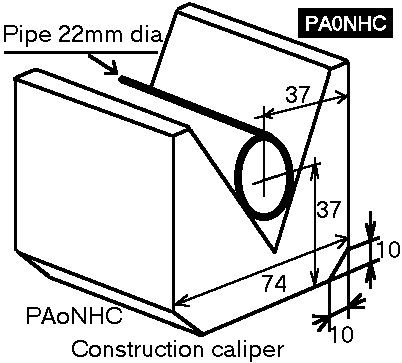
Take another sideplate "J" and press it on the other side of the cavity under construction, to the wooden caliper and the topplate "A". Solder "J" on the inside of the cavity temporarely on "H" with only 2 solderpoints.
Check the position of "J" and correct it. Then solder further like the other plate "J" in 13.2 ( alternating inside / outside etc.) until all solderpoints are abt 10mm apart.
13.4 Then flow all solderpoints together by slowly moving the soldering-iron over the solderpoints. While soldering squeeze the sidewalls "J" lightly together to ensure correct position, with a wooden caliper and topplate "A" acting as spacers between them. The resulting solder-line must be smooth, with good attachment to the coppersurface!
13.5 While holding the central conductor in position by resting the end of it on the wooden caliper, use a sidelid "M" for getting the correct distance for positioning topplate "A". Lock and solder topplate "A", in the same way as above mentioned, to sideplates "J" and baseplate "H" in the cavity. Remove the wooden caliper.
13.6 Fixing the sidelid:
You can temporarely solder two M3 screws on the outside of sidelids "M", so you can handle the lid easier.
BEFORE you solder the sidelid "M" in place, tougroughly degrease all parts inside the cavity with f.i. alcohol. Remove all fingerprints etc. with a fine abrasive dry sponge. Do not touch anymore with bare hands. The copper surfaces oxydize fast!
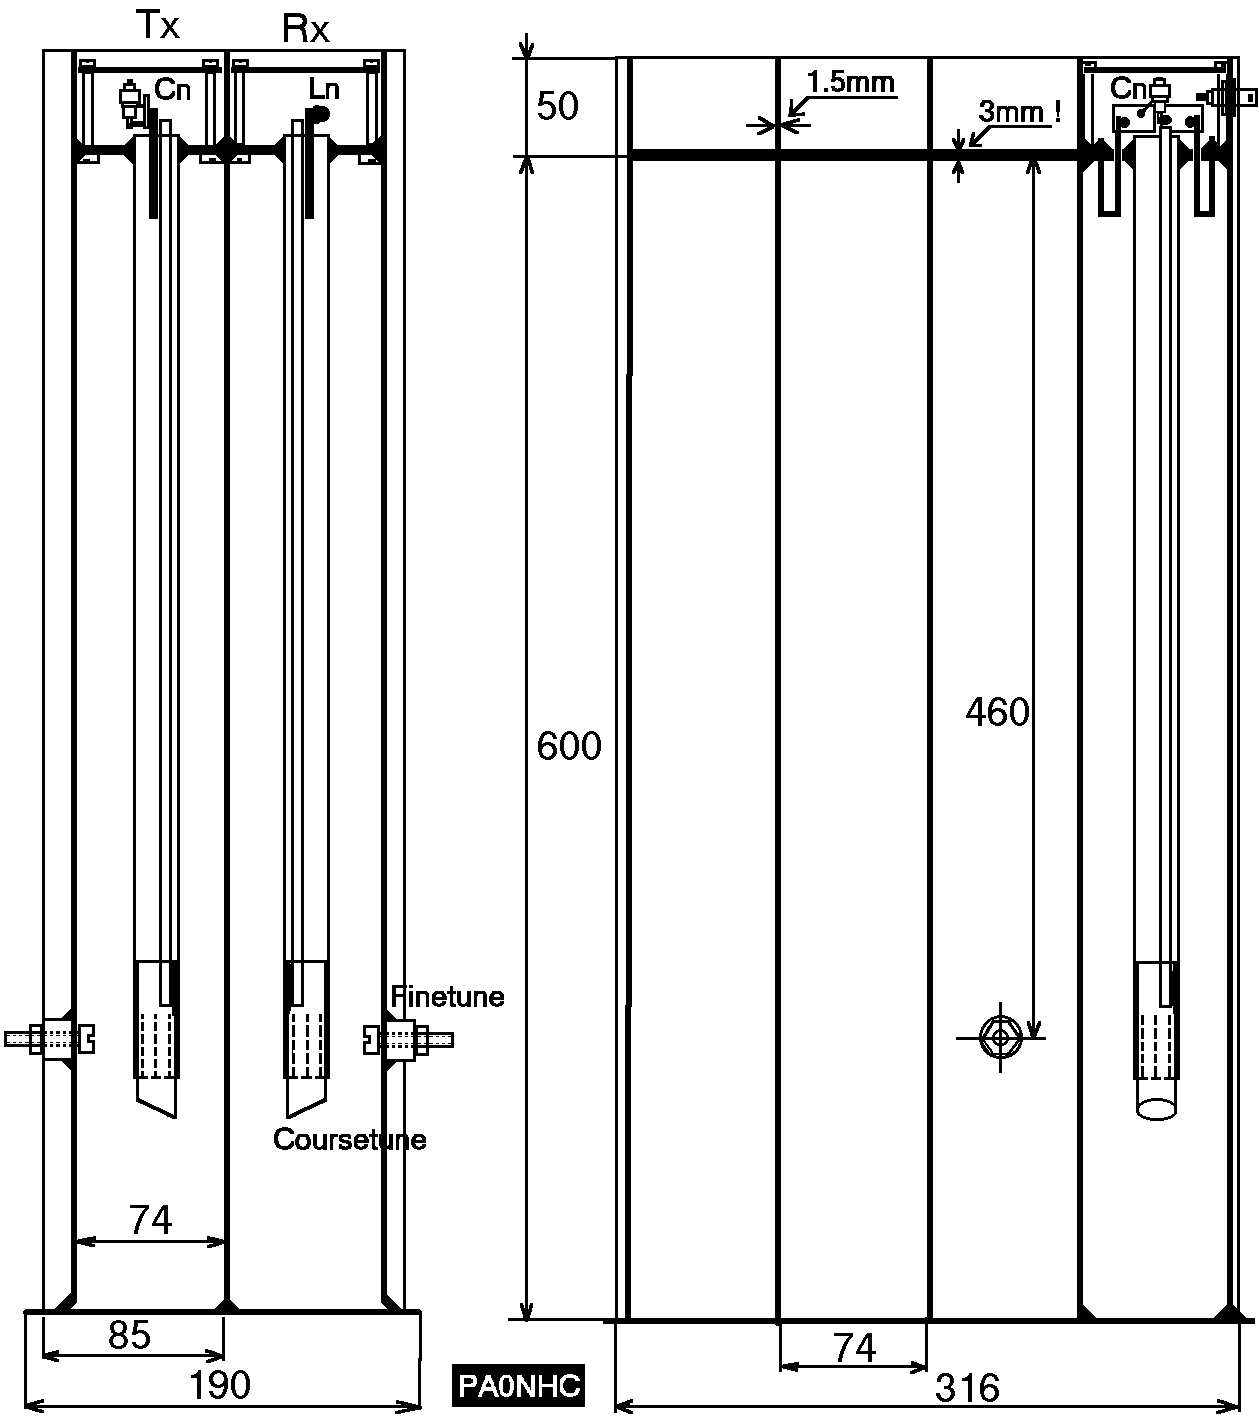
Insert the sidelid "M" in the cavity. The internal distance between the sidelid and the baseplate "H" should be 74mm (measure a distance of abt. 9.5 mm between the outside of "M" and "J").
Temporarely fix "M" with one solderpoint in the middle of each side. Check for the correct position, and correct it.
When OK, solder all 4 sides of "M" at the same way as the sidewalls to the baseplate. Do not use to much solder, as it can go between the plates into the cavity, intermittently short circuiting the inner surface of "M" to "J". This ruins the filter.
13.7 Solder the little top-sidewall "K" in place. Temporarely place the toplid "L". This helps to get "K" at the right place.
13.8 Clean all outer surfaces, the inside of the top, and the toplid of this cavity. Remove all grease and stains. Do not touch with bare hands. Spray the outside and the top with (blank) spray en let dry. Do not paint the inside-surface of the next to build cavity.
This cavity is now ready for adjustment and testing.
13.9 When assembling the next cavity, start at again 13.3.